Water droplets

I love shooting still life pictures. The whole process is so much fun – from the creative thought, to setting up your equipment the right way, to experimenting over and over, to editing and making the final touches on the image…and all of that from the comfort of your own home.

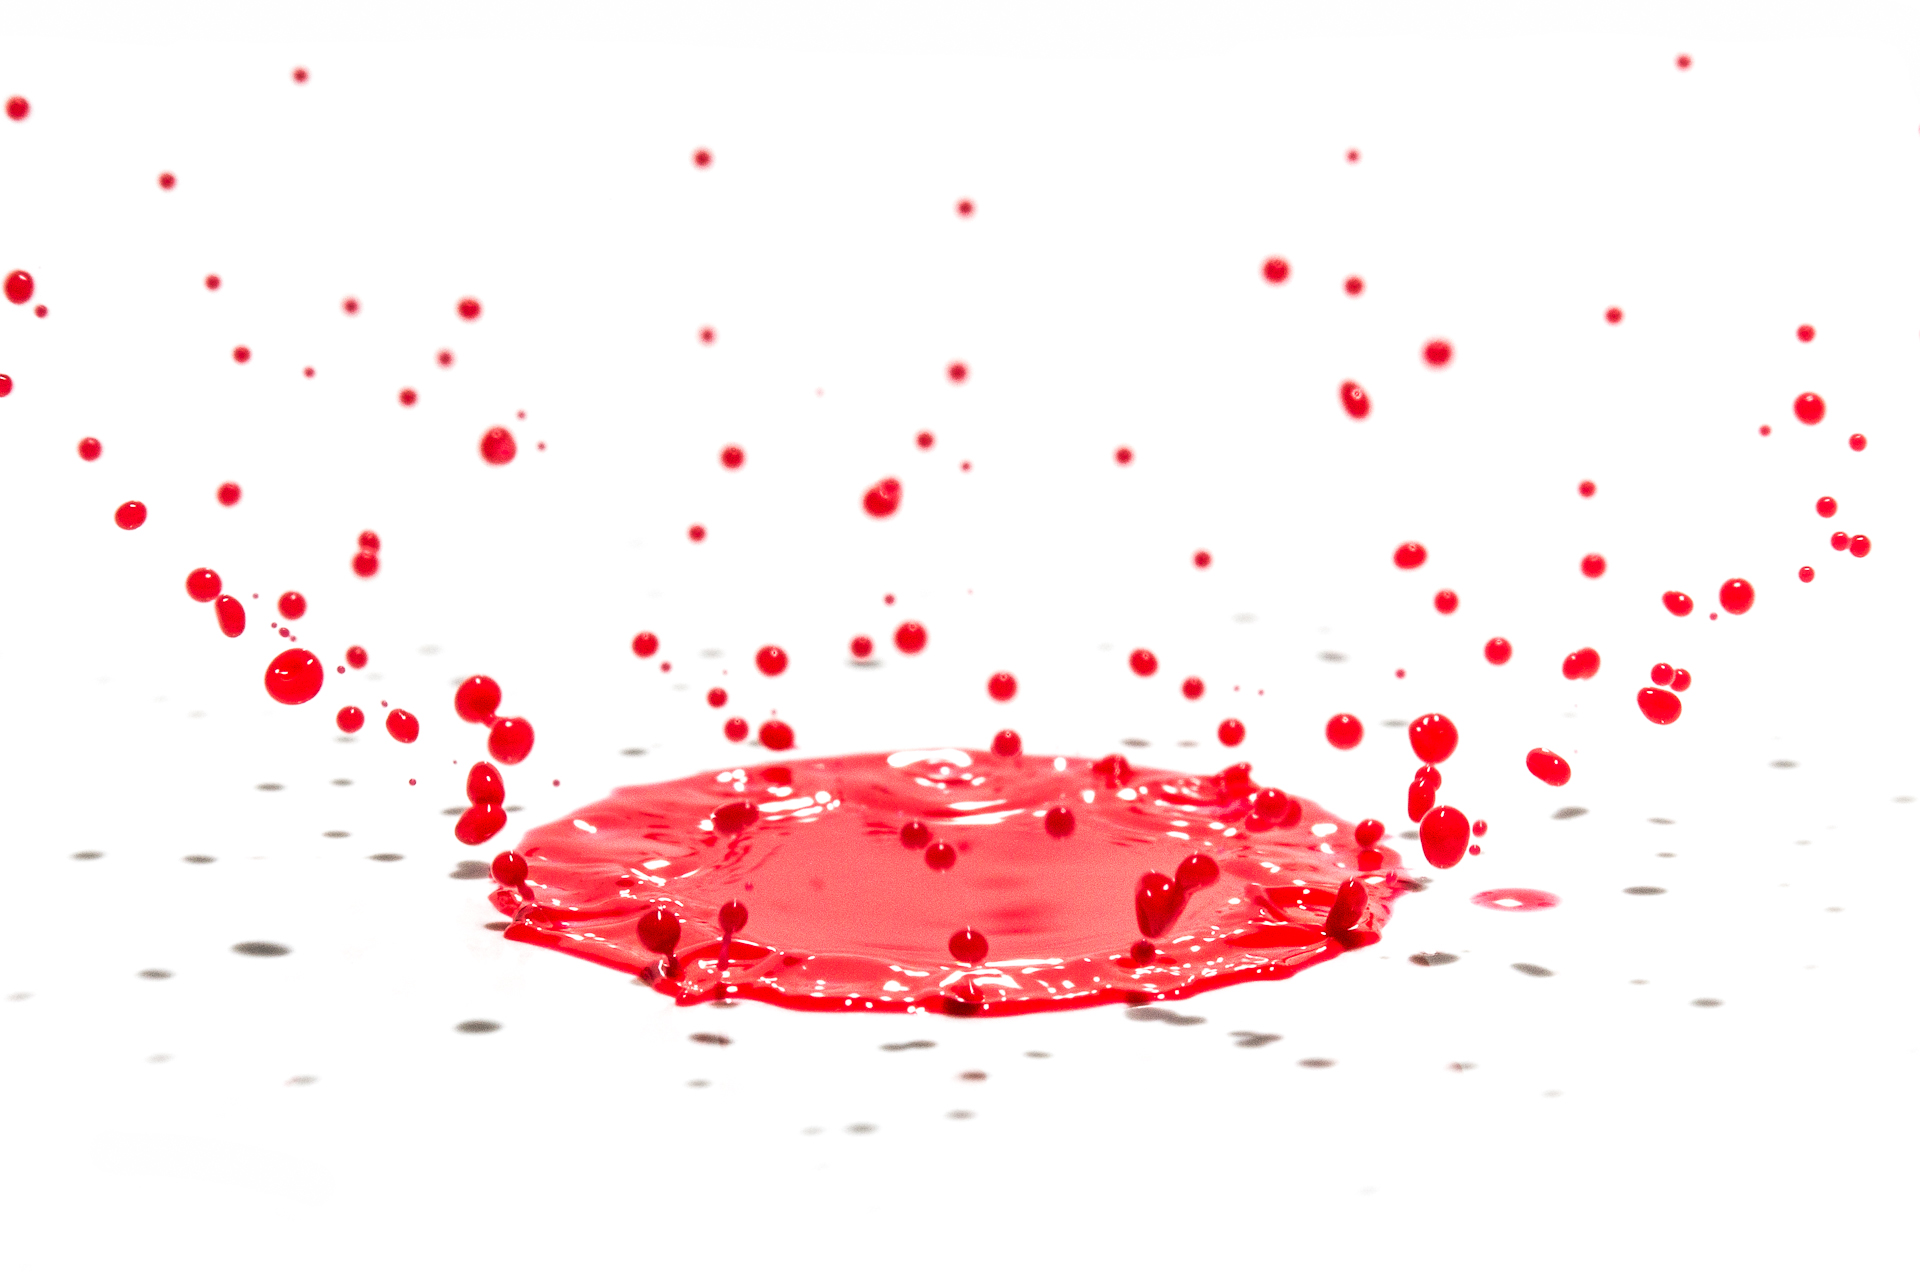
My first successful still life picture was that of the Paint Splash which I had taken last April. Shortly there after, I decided to do a similar experiment, only this time attempt to freeze a water drop as it falls into a pool of water. Water drop pictures are in abundance – perhaps one might argue that this is by far the most popular still life photograph on the internet. Skipping therefore a big chunk of the creative thought process, I proceeded to set up my equipment out on my balcony. The ingredients for this shoot, were simply 2 tripods (one to hold the camera and one to hold a zip lock bag full of water), my off-camera flash, a black paint dish, a few coloured sheets of cardboard and my trusty camera remote trigger (see photo link of my entire setup).

The cardboard sheets play an important role in the whole recipe. The off-camera flash is aimed directly at the cardboard, so the sheet’s colour will dictate the colour cast of the entire image. For this experiment, I tried with red, lime green and blue, but in my opinion the blue one came out best.

Water drop 1920cShot with my Canon 60D and Canon 100mm F2.8 prime macro lens at ISO 100, F11, 1/250 sec.

Advertisement

Explosion of light!

After a successful attempt at photographing an unplugged light bulb, I decided that my model was destined for bigger and better things. In this new photo-shoot (a journey of no return), I placed the bulb in a zip lock bag, then used a hammer to break the outer part, crossing my fingers that the filament would remain intact.

I then hooked up the bulb onto the electrical rig that I had built for my previous experiment, secured my camera on the tripod, and dialed in the continuous shooting mode. With one hand on the electrical switch and the other on my remote cable release, I turned on the power and fired 5-6 continuous shots. The result is the picture below – the final grande portrait and a testament of my subject’s short-lived modeling career.

Filament Lamp - 1920c

Shot with my Canon 60D and Canon 24-70 F2.8L lens, manual settings at ISO 200, F5.6, at 1/1000 sec.

Let there be light!

Staying in Nicosia on a blistering hot Saturday morning, is definitely quite painful. With nothing else to do, I decided to stay in, put the A/C on max and keep myself entertained with another photography project. This weekend’s inspiration comes from another one of my favourite photographers/tutors – Gavin Hoey. Gavin has an excellent website with lots of tips and tricks on photography, but unlike many others, his tutorials apart from teaching you various photography techniques, they take it a step further by teaching you how to best enhance or manipulate these images in Photoshop.

Over the last few months I’ve started learning various post production techniques in both Photoshop and Lightroom. Even though I am a big proponent of getting everything right in camera, there is definitely value in learning how to use these tools, either to overcome the various limitations of cameras e.g. colour saturation, incorrect exposure readings etc, or to simply manipulate images to create some artistic results. After-all, post production has been around as long as cameras, only difference is that in the older days things used to be done in dark rooms instead!

The cool thing about this project, was the fact that I had to put my electrical wiring skills to work, so that I could control the intensity of the bulb using a dimmer switch. After I managed that (see link), I took a picture of the lit bulb, a separate image of the bottom part of the bulb, and then imported everything into Photoshop for some basic manipulation – essentially fit the two together, making the bulb seem as if not wired at all….and here is the result!

Light Bulb2 - 1920c

Taken with my tripod mounted Canon 60D, 24-70mm F2.8L lens, ISO 100, F8.0 at 1/8 sec.

Heineken Splash

My inspiration for this weekend was to photograph beer splashing out of a bottle.  Spilling beer however is considered sacrilege by many men, so the precious liquid first had to be consumed and then replaced with water and a few drops of green food dye.

The setup was fairly simple – I first placed a white cardboard as my background, and positioned my speedlight aimed upwards so that the light would bounce off the cardboard and light up the scene. The bottle was then filled up with the green liquid, then poured downward into a collection vessel positioned below. While gravity was doing its job, I triggered my camera (set to continuous shooting mode) and managed to get 4-5 shots before the bottle was completely empty. I then refilled and tried again for a total of at least 5-6 rounds before I got the shot below. The picture was then inverted in Photoshop and voila!

Heineken Bottle2 - 1920c

Shot with my Canon 60D and Canon 24-70 F2.8L lens, at ISO 100, F8.0 at 1/200 sec. Flash was set to manual at 1/8th of its power.

Paint Splash Triptych

Walking into any contemporary art store, one is sure to find art pieces made up of either a single image cropped onto multiple canvases, or a series of images each mounted on a separate canvas. My personal favourite is the latter, as usually any one of the images can stand on its own, however when put together most often than not they tell a compelling story.

I can’t truthfully say that I had this in mind when I was experimenting with my paint splash project earlier in April. However once I started editing my images, I came up with the idea of creating a Triptych, depicting the fate of the paint drop as it hits the ground. Here are the 3 images in sequence – anyone think they would make for a good art piece on my wall?

triptych1a

Paint splash2 - 1920c

triptych3

Paint Splash

What better way to start the weekend than planning a photo shoot! This past Friday I left work and headed to do a bit of shopping in preparation for a mini project I’ve been wanting to do for some time now. The shopping list included a small bottle of red water-based paint, two glossy white ceramic tiles and an eye dropper. The idea was to photograph at high speed, a paint drop as it rebounds off the ground (or in this case one of the ceramic tiles).

The setup was fairly simple. I set the first tile flat on a coffee table, then placed the second tile perpendicular to it, essentially creating a mini studio. I then watered down my paint, squeezed some into my eyedropper, and then fixed the eyedropper vertically above the flat tile onto one of my tripods. I then fixed my speedlight flash near the eyedropper facing down, so that the light would rebound off the standing tile. Here is a photo taken with my cell phone of the entire setup (link).

With a towel standing by, I then started squeezing drop after drop, while triggering my camera with my wireless remote. It took a bit of luck and coordination, but boy was I happy when I managed to get this beautiful red crown!

Taken with my Canon 60D and Canon 100mm F2.8 macro lens, at ISO 200, F16, 1/200th of a sec. Flash set to manual at 1/16th of its power output.

Paint splash2 - 1920c

Smoke Photography

One of my favourite websites for photography is the Digital Photography School (DPS). I must admit that most of the inspiration I get is from the wealth of information shared by both professionals and amateurs on this site’s forums.

This past October, I was reading an “Introduction to Smoke Photography” article, written by Amar Ramesh. The pictures posted by Amar were simply stunning and the technique he had used seemed fairly trivial. I was certainly intrigued by how the combination of the element of smoke, with still pictures could create such a dynamic effect. So I gave it a go..I went to a local artwork store, bought myself some black cardboard, spent a couple of hours at home taking some shots and voila!

Coffee Mug Red smoke - c

Smoking cow final - 1920c

If you want to read more on this technique, here is the link to Amar’s article on DPS.