How far is too far?

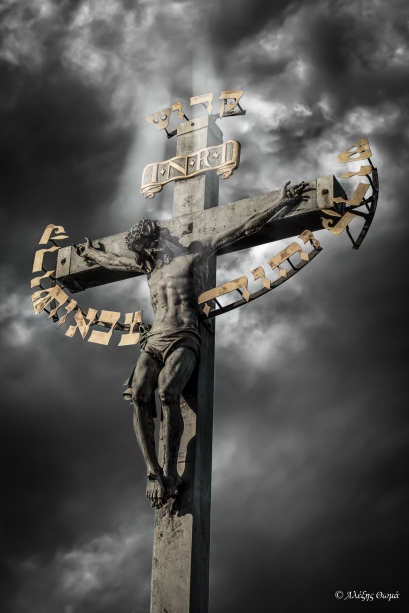
Today’s blog post is of a controversial nature. The topic is not religion (as may be alluded by the image below), but that of the arguable subject of image post-processing. There are countless debates on many photography forums on what is considered going too far with image manipulation. What makes up a great image? Should images remain untouched as they come straight out of the camera, or is some retouching allowed to overcome camera limitations? If you can retouch, how far can you go? Where does one draw the line? Unfortunately I don’t have the answer to any of these questions and from my reading there is a diversity of opinions. It is fair to say however that the vast majority of images we see daily in printed media undergo a fair bit of manipulation.

During my photo-walk in Prague late last month, I passed by the statue of Jesus on the cross (formally known as the Crucifix and the Calvary), towering to the side of the Charles Bridge. I was really impressed by the size and craftsmanship, but being a sunny afternoon, I was disappointed by the deep blue sky in the background. Nevertheless, I proceeded to take a picture like countless tourists had done before me. Next day, the weather took a turn for the worse, so while on another walk in a different part of the city, I decided to turn my camera towards the sky and take a picture of the bold clouds. Having in mind the statue’s picture from the previous day, my aim was to take an underexposed picture (to emphasize the boldness) but framed in such a way, so that if I were to replace the blue sky with the cloudy one, a break in the clouds would roughly appear just above Jesus’ head.

The result of this simple Photoshop manipulation is the picture below. I took it one extra step to brush in a beam of light rays from a Photoshop brush set created by Gavin Hoey – one of my favourite photography tutors. So what do you guys think – have I gone too far?

Jesus - 1920c

Jesus on the cross – taken with my Canon 60D and Canon 24-70 F2.8L lens at ISO 100, F11, 1/100 sec.
Clouds – taken with my Canon 60D and Canon 24-70 F2.8L lens at ISO 400, F8.0, 1/2500 sec.

Advertisement

Interior Design Photography

Earlier this month I decided to venture into the unknown world of interior design photography. To this date I had never given this type of photography any thought, but the recent purchase of a new wide angle lens and my cousin’s request to assist him in building his portfolio, was all that was needed to convince me to give this a try.

With little understanding of the intricacies involved in this type of photography, I started first with some research online. I was  happy to easily find some good tips on equipment setup and even happier when I found a post processing workflow tutorial from a professional interior design photographer. At first it was disheartening to read about all the gear that pros use for such pictures – expensive full frame cameras, tilt-shift lenses, multiple external light diffusers and beauty dishes. Nevertheless, I decided to use natural light as my ally (as well as light from the light fixtures installed) along with my trusted gear (tripod, levels and remote triggers).

The result of this first attempt is the dining room picture below. I am fairly happy with the result and so is my cousin – the latter party not always easily pleased when it comes to art!
Dining Room - 1920c
Shot with my tripod-mounted Canon 60D and Sigma 10-20mm F4-5.6 DC HSM lens at ISO 100, F8.0, 0.8 secs, bracketed at -2/0/+2.

Photographing the Milky Way (Part 2)

Last June, I blogged about my first attempt at capturing a shot of our own galaxy – the Milky Way. Earlier in September I headed out again into the wild on a dark moonless night, for another round of astro photography. This time around I had high hopes of getting a shot of the Andromeda galaxy, the nearest galaxy to our own, which around September starts showing up in the early night hours just above the horizon. Unfortunately I failed miserably, as the lens and technique that I ended up using, didn’t really cut it.

The night however didn’t completely go to waste. Prior to my trip to Italy this summer, I mentioned that I had purchased a Sigma 10-20mm ultra wide angle lens. This lens is great for landscapes, but it is equally good when it comes to astro photography. At its widest setting (10mm), this lens can stay open for nearly 40 seconds on an APS-C camera such as my own, without capturing any trails. The trick here is that the closer you zoom into a star, the easier it is to detect the trail of the star caused by the earth’s rotation. Time is key here, because you want the shutter to stay open for a longer period of time so that you can record as much light (and hence more detail) as possible without at the same time capturing any trail.

Here is the result of my second attempt at the Milky Way with my new Sigma lens.

Milky Way - 1920c

Shot with my Canon 60D and my Sigma 10-20mm F4-5.6 DC HSM lens, at ISO 3200, F4.0, 35 secs.

Venice Sunset

Most photographers are suckers for a good sunset picture…and admittedly I am no different. What’s great about a sunset (and sunrises alike), is that during these so-called golden hours, the light is more diffuse thus reducing the hard shadows you would normally get in mid day. The colours also are much warmer, especially during twilight, and when combined with an interesting background (such as a cloudy sky), it makes landscape photographs even more compelling.

Getting a good one is no easy feat however. This is one of my many attempts at getting a decent sunset during my recent trip to Venice, Italy. Not sure I managed to get it right, especially given that I had no tripod and my camera had to rest on the side of a bridge!

Venice sunset - 1920c

Taken with my Canon 60D and Sigma 10-20mm F4-5.6 DC HSM lens, at ISO 200, F8.0 @ 6 secs (bracketed at -2/0/+2).

Perfume Scent

Just north east of Venice, and only a few minutes away on the Vaporetto, is the island of Murano. This island is world famous for its glass making, and while there I had the chance to witness first hand the skills of the local artisans, by attending one of the many shows that were available for the visiting tourists.

I am not big on souvenirs, because I truly believe that the best memento I can get from any place I visit, is a decent selection of photographs showcasing the best the region has to offer. I did however break my rule this time around, when I walked into one of the many glass shops and saw this tiny perfume bottle. Believe me when I say that I have no practical use for this bottle, but what compelled me to purchase it was my immediate thought of photographing it with smoke coming out of its nozzle! For me this isn’t really a new idea, as I have tried smoke photography before with a coffee cup and a cow milk container (see link). Nonetheless, here is yet another attempt, the final result of which is fairly close to what I initially had in mind.Perfume bottle - 1920c

This is a composite of two separate photographs – one of the smoke and one of the actual bottle.

Smoke: Taken with my handheld Canon 60D and Canon 24-70mm F2.8L lens at ISO 100, F13, 1/250th of a sec.

Perfume Bottle: Taken with my tripod mounted Canon 60D and Canon 100mm F2.8 lens at ISO 100, F16, 1.3 sec (with +2 1/3 ev)

Rainbow Windows

To mark my 50th post on this blog, it’s time for a small facelift! Time to switch up the header image into something a bit more colourful!

One of the key ingredients to getting a decent picture, is proper composition i.e. how to best frame the shot. When I started reading my first photography book, the first chapter was all dedicated to explaining some basic principles one generally has to follow to properly compose a photograph. I’ve read about the rule of thirds, leading lines, foreground interest etc, but for some reason my favourite one is patterns. Can’t explain it really – but somehow the ability to capture patterns either natural or man-made, always brings a natural rhythm and harmony to photographs.

This is a picture I took on my recent trip to Venice. Admittedly though, I got in and tampered with it a bit in Photoshop, as the original one captured had all windows in a uniform deep green colour. There was nothing wrong really with the original picture, but since I wanted something cheerful to uplift the face of my blog page, I thought appropriate to add some colour in post production.

Rainbow windows - header

Taken with my Canon 60D and Sigma 10-20mm F4-5.6 DC HSM lens, at ISO 100, F8.0, exposed at 1/60th of a second. Processed in Photoshop CS6.

Explosion of light!

After a successful attempt at photographing an unplugged light bulb, I decided that my model was destined for bigger and better things. In this new photo-shoot (a journey of no return), I placed the bulb in a zip lock bag, then used a hammer to break the outer part, crossing my fingers that the filament would remain intact.

I then hooked up the bulb onto the electrical rig that I had built for my previous experiment, secured my camera on the tripod, and dialed in the continuous shooting mode. With one hand on the electrical switch and the other on my remote cable release, I turned on the power and fired 5-6 continuous shots. The result is the picture below – the final grande portrait and a testament of my subject’s short-lived modeling career.

Filament Lamp - 1920c

Shot with my Canon 60D and Canon 24-70 F2.8L lens, manual settings at ISO 200, F5.6, at 1/1000 sec.

Let there be light!

Staying in Nicosia on a blistering hot Saturday morning, is definitely quite painful. With nothing else to do, I decided to stay in, put the A/C on max and keep myself entertained with another photography project. This weekend’s inspiration comes from another one of my favourite photographers/tutors – Gavin Hoey. Gavin has an excellent website with lots of tips and tricks on photography, but unlike many others, his tutorials apart from teaching you various photography techniques, they take it a step further by teaching you how to best enhance or manipulate these images in Photoshop.

Over the last few months I’ve started learning various post production techniques in both Photoshop and Lightroom. Even though I am a big proponent of getting everything right in camera, there is definitely value in learning how to use these tools, either to overcome the various limitations of cameras e.g. colour saturation, incorrect exposure readings etc, or to simply manipulate images to create some artistic results. After-all, post production has been around as long as cameras, only difference is that in the older days things used to be done in dark rooms instead!

The cool thing about this project, was the fact that I had to put my electrical wiring skills to work, so that I could control the intensity of the bulb using a dimmer switch. After I managed that (see link), I took a picture of the lit bulb, a separate image of the bottom part of the bulb, and then imported everything into Photoshop for some basic manipulation – essentially fit the two together, making the bulb seem as if not wired at all….and here is the result!

Light Bulb2 - 1920c

Taken with my tripod mounted Canon 60D, 24-70mm F2.8L lens, ISO 100, F8.0 at 1/8 sec.

Heineken Splash

My inspiration for this weekend was to photograph beer splashing out of a bottle.  Spilling beer however is considered sacrilege by many men, so the precious liquid first had to be consumed and then replaced with water and a few drops of green food dye.

The setup was fairly simple – I first placed a white cardboard as my background, and positioned my speedlight aimed upwards so that the light would bounce off the cardboard and light up the scene. The bottle was then filled up with the green liquid, then poured downward into a collection vessel positioned below. While gravity was doing its job, I triggered my camera (set to continuous shooting mode) and managed to get 4-5 shots before the bottle was completely empty. I then refilled and tried again for a total of at least 5-6 rounds before I got the shot below. The picture was then inverted in Photoshop and voila!

Heineken Bottle2 - 1920c

Shot with my Canon 60D and Canon 24-70 F2.8L lens, at ISO 100, F8.0 at 1/200 sec. Flash was set to manual at 1/8th of its power.

Paint Splash Triptych

Walking into any contemporary art store, one is sure to find art pieces made up of either a single image cropped onto multiple canvases, or a series of images each mounted on a separate canvas. My personal favourite is the latter, as usually any one of the images can stand on its own, however when put together most often than not they tell a compelling story.

I can’t truthfully say that I had this in mind when I was experimenting with my paint splash project earlier in April. However once I started editing my images, I came up with the idea of creating a Triptych, depicting the fate of the paint drop as it hits the ground. Here are the 3 images in sequence – anyone think they would make for a good art piece on my wall?

triptych1a

Paint splash2 - 1920c

triptych3